
Scenario.
Whether you are a Webmaster, a Musician, Affiliate Marketer, a CEO of a company, or a wanna be in the film industry.
Whenever you start thinking of marketing you'll also start thinking of promotional
videos. Being it for the Television, Podcast, DVD, Youtube, or the press, regardless how you'll want
it to be, you should first start thinking of Adobe Premiere Pro
, the number one price reasoning, and professional desktop Video Editor.
In this tutorial you'll learn how to use Adobe Premiere Pro CS4. You'll get to know what premiere is really capable of, and how you can easily create a composition and start off head creating a stunning video using premiere Pro CS4.
[This tutorial is standardized to also fit the upcoming product versions]
What Is Adobe Premiere Pro CS4?
Adobe Premiere Pro CS4 is a professional high-end desktop Video editor, that allows you edit video, and afterwards render it into your desired high quality formats.
Welcome To Adobe Premiere Pro CS4.
Any time you'll start Premiere Pro CS4 the welcome dialog box will prompt with some options for getting started. See illustration below.
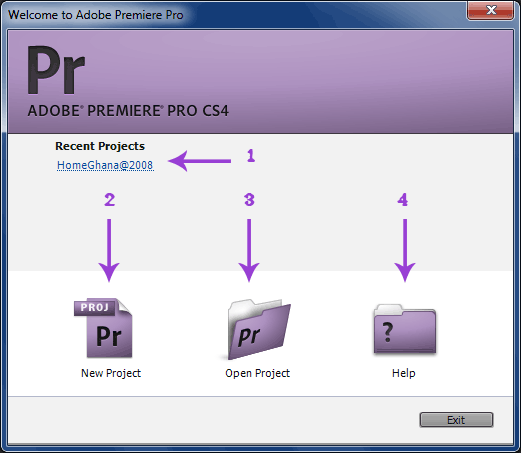
Explaining The Welcome Screen Content.
In the above illustration, I've numbered all sections and would like to explain their uses here.
- Section 1 displays a hyperlink to the recent opened projects, this enables a shortcut to starting these projects without digging through a wide range to find them.
- If you want to start a new project, you'll click on the section 2, the New Project button.
- Section 3 will open a path to an existing Project on your hard-disk.
- Section 4 Help button will connect you to the CS4 online help page. [internet access required].
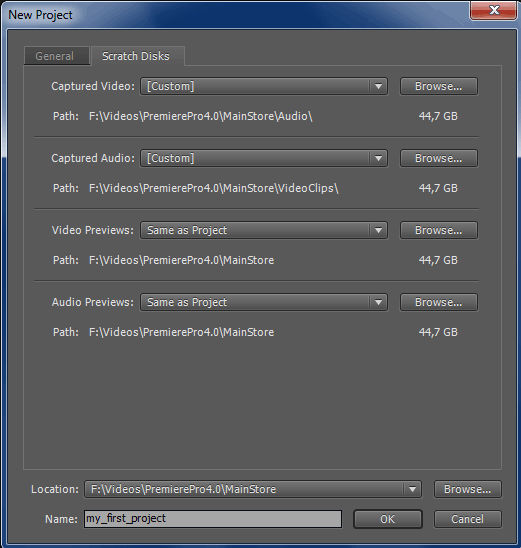
Settings For A New Project.
The General Tab.
To start a new project you'll first click the New Project button, as described in the welcome illustration above. The New Project dialog box will then open for you to start setting up for your new project. The dialog comes with two tabs, The General tab and the Scratch Disks tab. See illustrations below.

Action and Title Safe Areas, allows you to define the horizontal and vertical safe areas for your Title and Action. This will insert guide lines into the preview window which will guide you when placing a title or an Action.
Video allows you to select the Display Format for Video in your project, either in;
- Timecode
- Feet + Frames 16mm
- Feet + Frames 35mm
- Frames
Audio allows you to select the Display Format for Audio in your project, either in;
- Audio Samples
- Milliseconds
Capture allows you to select the Video Capturing Format for your project, depending on the source device either it's a;
- DV
- HDV
Location allows you to browse and select a partition, and a folder, or create a new folder on a partition where your project file will be saved in.
Scratch Disks Tab.
On the Scratch Disks tab, you have the possibility to customize where on your hard-disk(s) captured, and previews of videos, and audio files should be saved. You must then select in the drop-down list [Custom], and browse to select your desired folder.
You may also decide to let all files be saved in the same folder as your Project file, by selecting in the drop-down list Same as Project. And all files will be saved in the same folder as the selected Location folder on the bottom of this dialog. See illustration below.
Select New Sequence For Your Project.
After bringing all the settings above to your desire, you'll at next have to name your project, and then click the OK button. This will load the New Sequence dialog box, where you can select the right sequence for your project. See illustration below.
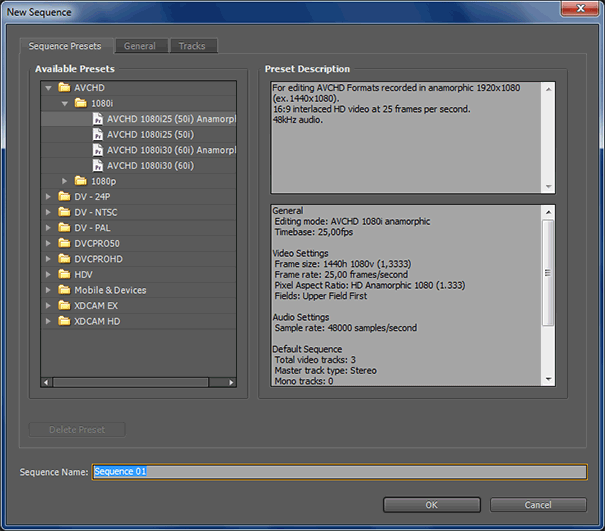
On the left side, Premiere Pro CS4 has enough presets you can choose a sequence from. Any preset, you'll select, will display a detailed information about it on the right side. If you have no idea, which sequence will fit in your project, just choose any one, enter sequence name, hit the OK button to start the application window.
You can create a new, or edit your selected sequence later in the application window to fit your project.
Getting Familiar With The Premiere Pro CS4 User Interface Overview.
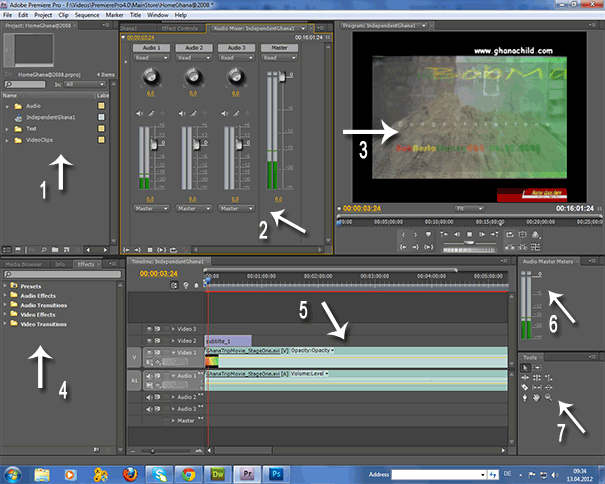
The Adobe Premiere Pro CS4 consist of Frames and Panels like in After Effects CS4 , I'm going to explain it a bit so you'll get the clue 'bout how it works. Follow the numbers in the illustration below.
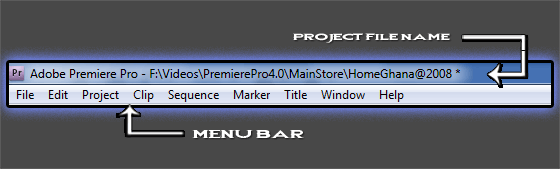
Menu And The Project File Name Bar.
On the top left corner of the interface, you'll find the currently opened project file name.
In the next line follows the Menu Bar with nine menu buttons from File to Help. See illustration below.
Explaining The Numbered Frames And Panels As Indicated Above.
- Section 0 contains the Menu Tool Bar and the Project File Name. See illustration above.
- Frame 1 contains the Project information panel, and the panel contains the defined Sequence, Objects, Files and Folders.
- Frame 2 holds the Audio mixer panel, which allows you mix up to three Master channels, and control the overall volume level using the main Master track controller.
- Frame 3 is the video preview panel. It also contains the playback controls underneath.
- Frame 4 contain three panels inside as follows;
- Media Browser panel. This allows a full connection to your hard-disks, both extern and intern.
- Info panel displays the current selected item's information.
- Effect panel. This contains the Video and Audio Effects, Presets, and Audiovisual Transitions.
- Frame 5 is the Timeline. This is where you'll drop your Audio and Video instances, Trim and Edit them, adding keyframes and so on.
- Frame 6 is a separate Audio Master Meters panel, which could also be used to watch the Master volume level behaviour.
- Frame 7 holds the tools needed to Edit the Timeline instances. E.g. Razor Tool, Pen Tool, Ripple Edit Tool, Rolling Edit Tool, Selection Tool, Rate Stretch Tool,and more.
FastLane Tip#1
You can easily drag and drop every panel from one Frame to another, re-arranging them as desired. And later saving the workspace by simply selecting from the Menu bar, Window » Workspace » New Workspace, give your workspace a new name, and this will appear in the Workspace list. You can select your defined Workspace at any time from the list, and this will change the current Workspace to your defined settings.
FastLane Tip#2
For more tutorials on Adobe Premiere pro visit Adobe Video Tutorials Site. And for further information on the current version visit the https://adobe.com/downloads page.
- Products Information
- Premiere
- After Effects
- Dreamweaver
- Flash
- Action Script
- Photoshop
- Fireworks
- Illistrator
- In-Design
- Bridge
- Light Room
Top Articles.
- The Hottest Stuff. Burning Hot!
- How To Find Success In Business
- Free Website Creation Tutorials
- Free Blog Creation Tutorials
- Scripting Tutorials
- Adobe Trail Products And Tutorials
- Sony Creative Software Tutorials And Trails
- Entertainment Corner, More Music And Videos
- Explaining Bitmap And Vector Graphics
- Desktop Audio Recording Setup
- Audacity, A Robust Free Audio Recording Software
- Learn Digital Sound Recording And Editing.
- Learn How To Use FL-Studio Easily.
- Selective Youtube Web-Video Tutorials.
- Get The In-Depth Free SEO Training.
- Affiliate Marketing Tips And Tricks
- Ghana Oil Boom.
- File Synchronization Tool
- Get Free Templates For Your Website
- Download Absolute Free Software
- Visit Our Knowledge Base
Clicks4UrMind
Man will give you worldly powers, and make you feel on top of all, note this is temporally and could be redrawn at anytime sending you back to the ground floor of life. However, the Lord Almighty, the one and the only rightful ruler of the Universe, blesses everlastingly.

Knowledge is Power, but Power is not Knowledge. Wisdom is the truthful Power that identifies the Knowledge within the man. And only, I repeat 3x. Only the almighty God has the power to bless the man with his Wisdom forever.
To achieve the Lord's blessings, cease not praying daily, asking for his Wisdom, and you'll be blessed abundantly...
Intro To Adobe Premiere Pro CS6.
SPYERA PHONE
Spyera Phone version is software that you install on a smart phone to monitor everything happening on the phone. After installation, SPYERA secretly records events (sms, call history, phone book, location, emails, What's App messages, IM, Facebook Chat, Skype, See photos taken and many more...) that happen on the phone and delivers these information to a web account, where you can view these reports 24/7 from any Internet enabled computer or mobile phone. SPYERA also allows you to listen to the surroundings of the target mobile , listen to the phone conversation and to know the location of the device.
Intro To Adobe Premiere Pro CC.
Please, Kindly Donate What You Can, Enabling Us Pay Hosting And Domain Costing, And Do More.


